Connect to Internet In Android Emulator Under Proxy Server
Generally when using Android Emulator, if you are not under any proxy servers, then the device by itself finds the DNS server and connects to the Internet without any problems. The problem of connection raises only when you are under proxy servers. The major reasons why this happens is that, your device cannot find the ip address to which it must connect and what the DNS servers that are available for the connection. So you must update the device with these information.
While starting the emulator itself you can pass the dns servers and your http proxy server credentials as parameters to the 'emulator' start command. So the command looks likes this. emulator -avd So the real command may look like: HVGA is a example device name In the place of for dns servers, you can enter upto 4 dns server address separated by commas. In the place of you can use the ip address of your proxy with the Port number to connect to it. If you got username and password to connect to your proxy server for authentication. You have got provision for that too. In the command you must pass your username and password as -http-proxy http://username:password@192.168.10.2:8080 You can also pass -debug-all or -debug-proxy to get the error report of the connection. If you are using Eclipse IDE for your development, then you need to supply this parameters in Eclipse Preference -> Android -> Launch -> Default Launch Options. 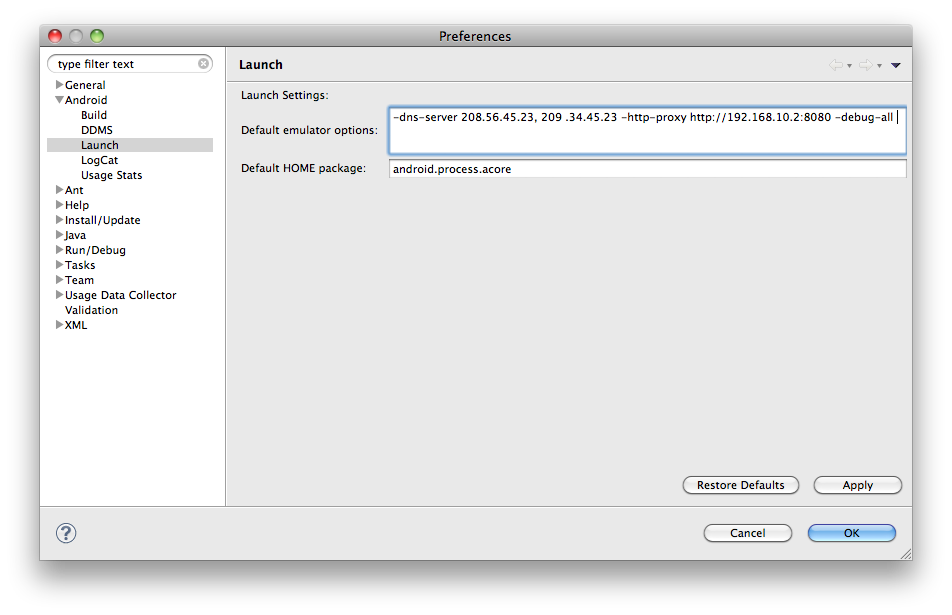 That's it, now you can start your emulator and find Internet is connecting to it. You can also set the proxy address and dns server details in your emulator by another way. By default, Android SDK searches for the DNS server details from resolv.conf file. On Linux and OS X, the emulator obtains the DNS server addresses by parsing the file /etc/resolv.conf. On Windows, the emulator obtains the addresses by calling the GetNetworkParams() API. Note that this usually means that the emulator ignores the content of your "hosts" file. (/etc/hosts on Linux/OS X, %WINDOWS%/system32/HOSTS on Windows). So first make sure that resolv.conf file is present in the desired location, if not make a symbolic link of the fie to the location where the device searches for the resolv.conf file. To find the present location of the resolv.con file use the following command. locate resolv.conf It will list few matched files, choose the one which you want. The contents of the resolv.cof file will be some thing like this. # # Mac OS X Notice # # This file is not used by the host name and address resolution # or the DNS query routing mechanisms used by most processes on # this Mac OS X system. # # This file is automatically generated. # domain TWOZAO nameserver 203.145.184.32 nameserver 192.168.10.1 Make a symbolic link to this file from /etc. ln /path/to/current/resolv.conf /etc/resolv.conf. Now you made your emulator to find the DNS servers and you can set the proxy address in your device, Go to Menu -> Settings -> Wireless & Network Settings -> Mobile Networks -> Access Point Names.  There you can select the APNs and you can fill the proxy address and its port number, username and password there.
Load Youtube toprated videos using simplexml_load_file PHP So here we go. General feed url of youtube is http://gdata.youtube.com/feeds/api/standardfeeds/FEED_IDENTIFIER Youtube feeds URL for the top rated videos is http://gdata.youtube.com/feeds/api/standardfeeds/top_rated Here you can replace top_rated with  Fore more info regarding this http://code.google.com/apis/youtube/2.0/developers_guide_php.html So we have to read the feeds from the above url, then you can display it where ever you want. We have the top rated videos as xml so we need to parse it using php function "simplexml_load_file() " . To do this in php.ini we need to enable the url include option to On if it is not already turned on. Get the feeds in a variable $url="http://gdata.youtube.com/feeds/api/standardfeeds/top_rated";  So we have top rated videos in $comments , we need to parse it using foreach and display it in the following way.  $media = $video->children('http://search.yahoo.com/mrss/');So from this we can easily parse all the data from the youtube feeds. Download the source for your reference. You can also do all other functionality like searching a video or displaying particular video comments, recent videos and more using the above method. Its very easier than the zend data api. Try it out. Leave the comments if you have any problem Create a New ZenCart Payment Module with Sample Module Source Code There are several payment modules in zen cart. You can find them under Admin > Modules > Payment in the admin panel. Many of them are for payment gateways where the customer's credit card is authorized automatically while they are online, and payment is deposited to your merchant bank account (which you set up with your bank) automatically. Zen Cart as gateways built-in for: 1. Authorize.net AIM (SIM also supported, but AIM is recommended for its security benefits) 2. PayPal Website Payments Standard (IPN) 3. PayPal Express Checkout 4. PayPal Website Payments Pro 5. LinkPoint API 6. YourPay API as well as: C.O.D. - Cash On Delivery. 2. File Structure: Payment modules must contain two compulsory files. 1. The payment class is stored in includes/modules/payment/ 2. while all text is stored in the appropriate language file includes/languages/ 3. The response from the payment server is handled by the files You can download the source of the sample Zen-Cart Payment Module
3. Anatomy of a Payment Module: The payment class must override some of the following pre defined functions in zencart payment module. So a payment class must contain definitions for the following classes. Constructor Method In the Constructor method, the modules initialization must be done. Set the class code, title, description, sort order and status of the module. update_status Method This method will be called whenever the status of the module in the admin panel is changed. Here the currency type and zone of the shop can be checked each time of update. javascript_validation Method Validate the user input submitted on checkout_payment.php with javascript (client-side). Example: validate credit card number, make sure required fields are filled in selection Method This method can be overridden to retrieve required information from the form before submit. Example: ask for extra fields (credit card number), display extra information pre_confirmation_check Method This method will be called before processing the checkout confirmation page (i.e, on calling the checkout_process.php). Here check if credit card information is right before sending the info to the payment server confirmation Method In this method check for the products details and payment information and execute before displaying the checkout confirmation page process_button Method This is the main function, which sends the needed informations to the payment server on submitting the payment form. Examples: add extra hidden fields to the form that are required by the server as POST to perform the transaction. before_process Method This method will be executed before processing the order. Check all the parameters before forwarding to checkout confirm page. Examples: retrieve result from online payment services after_process Method After processing, the confirmation of checkout this method will be called. after_order_create Method This is the last step in processing the check out. Here the orders are taken and the items in the cart are removed to customer purchase table and the products table is updated and successful shopping mail is send to the customer and the store owner. get_error Method If an error occurs with the process, output error messages here check Method This method is called every time this module is accessed, to check whether the module is in active state. install Method If the ‘check method’ returns, status of the module as removed or uninstalled. A install button will be displayed in the admin panel. On clicking on the install() button this install method will be called. The zen cart configuration table will be updated with the information such as module code, title, description and other required parameters of the module. remove Method After installing the module, remove button will be displayed on top of the module in admin panel. On clicking on that remove button the rows related to this modules in the zen-cart configuration table will be removed. PHP script to move files from shared hosting to amazon S3 BucketsPHP script to move files from shared hosting to amazon S3 Buckets  In this article i am going to explain how to copy/move all the files from your shared hosting server to amazon s3. Getting s3 access and how to use it tutors are so many there on net. Try to access those else it will be explained later. Amazon S3 is really great service to store and retrieve large amount of data with less cost and great security.Shared hosting means most of us are using storage space of 2GB Or 4gb server and that too shared by so many people, so its not only for you. This is not applicable if you are using dedicated server only for you but still you can try out amazon s3 service. Advantage of doing this task is really great. Here it is.... Eg: You have 20000 images or some documents that you always giving access to the people to check out. In such case if you are using shared hosting server surely your site will be dead slow to the people who all are accessing. If all the files are coming from some other server then your server only need to present the design then it will be great experience to surfing people. That other server is going to be amazon s3 of-course there are so many services are there for this one but amazon as3 is good. So lets try it. This full tutorial is based on the s3 php class from http://undesigned.org.za/2007/10/22/amazon-s3-php-class, which is very easy to connect to S3 Service and access files/edit/delete/upload files to and from the s3. Download the class and follow thew instructions. and alos i have uploaded a copy of my work which will be helpful for you to do it. try that also.  So lets expand it to upload all your files from the shared hosting server to amazon S3. In my case i have more than 20000 images in a folder called "[ROOT]inventory/images/" and this number keep on increasing daily. So i planned to move all the files to amazon s3. But here we have a problem, we cant copy all the files at one stretch because its >20,000, so its possible by running it part by part. Either by cronjob or by manual execution. Do s you want and use my script if it is useful for you. I stored all the file names in a table on database by listing files using the following command. create a table with filename, flagid (which is for task completion and keep it default as 0).  First run the imagelist.php to store all the files in table, then run the imageupload.php. It will upload only 100 images each time to the server,by using limit command. Once the upload process is over update the flag field to 1, so next time it wont be uploaded or even you can delete this field. Its upto you to handle it. More on this class- here is documentation http://undesigned.org.za/2007/10/22/amazon-s3-php-class/documentation  You can get the copy the source here Change the db settings and change the table fields as per your need and run it on your server. This tutor is based on nettuts tutor, thanks to nettuts. Its really some risky task so be careful on working on this. Please comment on it to improve more,and share this post....
Subscribe to:
Posts (Atom)
Follow Us on Twitter

|


