|
Showing posts with label Installation. Show all posts
Showing posts with label Installation. Show all posts
FFMPEG Installation Step by step guide in centos FFMPEG Installation Guide FFMPEG is an open source application and developed under Linux that allows you to convert video and audio files easily between a variety of different formats. It supports most industry-standard codec and can convert from one file format to another quickly and easily.It includes libavcodec, a leading audio/video codec library. FFmpeg can compile under most Operating Systems, including Windows. You can use this powerfull tool using any scripting language server side execute functions once you installed in your server. In php shell_exec(“command, parameters”); the following flow chart explain you how it works with php  This article will guide you to installing FFMPEG and other codec on Linux(centos 5). FFMPEG Installation Requirements · LAME Mp3 Audio Codec (Requred for mpg, flv, avi, wmv etc files) · FFMPEG ,mplayer,mencoder, flvtool2 · FFMPEG-PHP More Advantage When you installed these components · AMR Audio Codec (Required for 3gp video files) · XVID Audio Codec Note : You need to know how to use yum,rpm,wget commands well and these commands should be configured in the server in which you are going to install ffmpeg. · Make a note of what you are doing for future reference when ever you are facing problems · These steps are worked well for me and and am not sure how about for you, so please make some backup when ever you modifying your system files. Go ahead..... Installation Steps It is a good practice to install all the external audio codec libraries first and then install the FFMPEG. So now you need to connect to your server using any ssh tool like putty by giving server name , username, password.  cd /usr/ Create a directory for all the further steps mkdir downloads Move into downloads directory cd downloads Installing LAME MP3 Encoder  Download LAME Mp3 Codec download URL : Lame Mp3 Codec · Untar the lame file by using tar zxvf lametarfile · Assign 777 permission rights to the lame folder by typing chmod 777 lamefolder -R · Traverse to the root of lame folder and type wget http://easynews.dl.sourceforge.net/sourceforge/lame/lame-3.97.tar.gz Extract the archive: tar -xjf lame-3.97.tar.gz cd lame-3.97 ./configure make make install Installing – Ffmpeg Adding the DAG repository is simple. I’m using yum, so I did the following to add the repository: 1. Create and open a new file called /etc/yum.repos.d/dag.repo. vi /etc/yum.repos.d/dag.repo 2. Add the following text to the file: [dag] name=DAG RPM Repository baseurl=http://apt.sw.be/redhat/el$releasever/en/$basearch/dag gpgcheck=1 enabled=1 3. Finally, save and close the file. In order to successfully use the DAG repository with tools such as yum, you need to add DAG’s GPG key. Failure to do so will result in an error like the following: warning: rpmts_HdrFromFdno: Header V3 DSA signature: NOKEY, key ID 6b8d79e6 Public key for faac.x86_64.1.26-1.el5.rf.rpm is not installed In order to add the GPG key for DAG, run the following: rpm --import http://dag.wieers.com/rpm/packages/RPM-GPG-KEY.dag.txt Or if you dont need key validation just make gpgcheck=0 in the above dag.repo file So Now that DAG is setup, it’s a good idea to update all your packages. # yum update Now you are ready to install FFmpeg with yum. I wanted to install all the available FFmpeg packages, so I first asked yum what was available. # yum search ffmpeg Searching through the results, I found that three packages need to be installed: ffmpeg, ffmpeg-devel, and ffmpeg-libpostproc. # yum install ffmpeg ffmpeg-devel ffmpeg-libpostproc install supporting packages – mplayer,mencoder, flvtool2 yum -y install mplayer mencoder flvtool2 Preparing for ffmpeg-phpI often work with programs through command line calls in code, but I wanted something more robust this time, so I looked around and found ffmpeg-php. Based on the API, it looks to be a great tool to interface PHP and FFmpeg. There are four things that are required to successfully install and run ffmpeg-php; they are: · ffmpeg-0.4.9_pre1 or higher · php-4.3.0 or higher · gd-2.0 or higher · php-devel Run the following yum install php-gd In case you are wondering what php-devel is for, it installs the phpize program which is used to install ffmpeg-php. Installing ffmpeg-phpNow we are ready to install ffmpeg-php. This can be done in six easy steps: 1. Download the latestet ffmpeg-php from http://sourceforge.net/projects/ffmpeg-php/files/ffmpeg-php/ wget http://sourceforge.net/projects/ffmpeg-php/files/ffmpeg-php/0.6.0/ffmpeg-php-0.6.0.tbz2/download 2. Extract the archive: tar -xjf ffmpeg-php-X.x.x.tbz2 3. cd ffmpeg-php-X.x.x/ 4. phpize 5. ./configure && make 6. sudo make install It will copy the ffmpeg.so module in php default module location. Now you have to edit php.ini file to enable ffmpeg-php support in it by using ffmpeg.so module. vi /etc/php.ini and append following line extension=ffmpeg.so Restart apache service to take effect of php.ini /etc/init.d/httpd restart Run following command to ffmpeg module listing in php. php -m | grep ffmpeg For more about ffmpeg-php functions – documentation Now you should be ready to convert any video to any video format and still more, Have a nice streaming. Test it out using ffmpeg -i videofilename.extension You will be getting some message and info about the input file  Installing advanced ffmpeg supporting components AMR Audio Download URL AMR Audio Codec To install the AMR codec you will require both AMR-WB and AMR-NB files. XVID Audio Download URL: XVID Audio Codec Installing AMR Codec For installing the AMR codec there are two separate files that needs to be installed are AMR-WB and AMR-NB. · Untar the AMR file by using tar zxvf tarfile · Assign 777 permission rights to the amr folder by typing chmod 777 amrfolder -R · Traverse to the root of amr folder and type ./configure make make install Note on Installing AMR: You might get errors installing AMR codec on Autoconf utility of linux. To resolve this problem will have to install the latest version of Autoconf utility Dwonload AutoConf from Here Installing Xvid Codec · Untar the xvid file bu using tar zxvf tarfilename · Assign 777 permission rights to the lame folder by typing chmod 777 xvidfolder -R · Traverse to the root of xvid folder · Goto Build/generic folder and type
./configure make make install Leave A comment If you are facing any problem. Have a happy encoding and streaming, we will see set of streaming tutorials in next tutors. Fresh Installation of contrexx CMS
1. Introduction:
Contrexx is a powerful Open Source Web Content Management System (WCMS) which will assist you in the creation, administration and maintenance of contents for the inter-net or intra-net. It's a completely web-based system with an easy-to-use WYSIWYG editor and intuitive user interface. Contrexx is very flexible, by adding modules you can customize the CMS according to your individual demands and it requires no technical knowledge or previous training.  2. Pre – Installation: Installation of contrexx cms requires a working web server such LAMP, XAMP or WAMP. If have you got a correctly configured web server continue downloading the source package from Contrexx – Download. Unzip the downloaded source zip to DocumentRoot(Generally DocumentRoot means '/var/www/') of your web server. Rename the unzipped folder to contrexx. By Default, all the installation files comes inside of /contrexx/CMS_FILES, move all those files to the /contrexx (this step is optional). 3. Installation: Now point your browser to the location where you unzipped the files. In my case it is http://192.168.2.58/gowri/Project/contrexx/.  Now you can see a installation welcome screen. On the next screen you will be asked for the license agreement. On agreeing those things you will be redirected to System requirement check page. If your web server satisfies all the requirements. You will be allowed to the next configuration step. Now you can see a installation welcome screen. On the next screen you will be asked for the license agreement. On agreeing those things you will be redirected to System requirement check page. If your web server satisfies all the requirements. You will be allowed to the next configuration step.4.Configuration:  In the configuration step you will be asked for the databse name and the mysql username and password for creating a database and required tables with data for the project. In the hostname field give our hostname, localhost in general. Then provied the name for the database in the next field, if you have already created a database uncheck the 'create database' and provide the name or else check it and make sure no other database exsist in the server with same name. Table prefix is the text that u need to have before every table name of the database that is going to be created. In the next fields give the username and password for the MySQL server. If you want FTP connectivity check the 'use FTP' field and provided the correct details or else leave it blank. In the configuration step you will be asked for the databse name and the mysql username and password for creating a database and required tables with data for the project. In the hostname field give our hostname, localhost in general. Then provied the name for the database in the next field, if you have already created a database uncheck the 'create database' and provide the name or else check it and make sure no other database exsist in the server with same name. Table prefix is the text that u need to have before every table name of the database that is going to be created. In the next fields give the username and password for the MySQL server. If you want FTP connectivity check the 'use FTP' field and provided the correct details or else leave it blank.5.Installation warning:  At this stage of installation, most of the time you will be prompted with a long list of file permisssion errors. If u get such screen dont get scared, just change the premissions for the installation folder. You can even do this step before starting the installation process. At this stage of installation, most of the time you will be prompted with a long list of file permisssion errors. If u get such screen dont get scared, just change the premissions for the installation folder. You can even do this step before starting the installation process.To change the permission just run this command: sudo chmod -R -f 777 {folder's physical location from root}; After changing the permission, proceed to the next step by clicking the Next button at the last of the error list. 6. Database Creation:  Now you can see a screen just like the below one, giving the confirmation of creating all the database tables. In the next step you will be asked for the administrator's email id. Now you can see a screen just like the below one, giving the confirmation of creating all the database tables. In the next step you will be asked for the administrator's email id.7. Administrator's Account Here you will be prompted to provide the admin username and password. On correctly providing those thing the final success screen comes. Giving the backend and frontend urls.  8. Installation success 8. Installation successDefault Front End for visitors:  Admin Panel:  For more information about the Installation of Contrexx CMS: http://www.contrexx.ch/wiki/de/index.php?title=Contrexx_Manual:Contrexx_Installation_Guide Installing gtalk in ubuntu - (Google talk)
You can use gtalk in ubuntu
Just do the following 1. check for gtk2.0 and qt4 $ sudo apt-get install libgtk2.0-dev $ sudo apt-get install libqt4-dev 2. Remove 'pulse audio sound server' Open synaptic package manager and remove pulse audio $ tar -zxvf gtalx.tar.gz5. Get into the directory.... $ cd gtalx and then... $ sudo chmod u+x make $ ./make $ sudo ./make install 6. Enjoy..... Please comment about your installation(whether it was a success or not....) Take gtalx from Applications > Internet > gtalx Enter your gmail login information..and click connect... 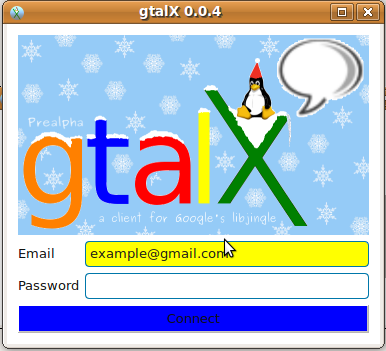 After successful login your online gmail buddies will be listed... Click the "Contact" button to "chat or call" that person..  Upon clicking the contact button you will be shown a screen like this.... If you need to chat..type your message and click "send"... If you want to talk..click 'call".... Enjoy....It worked successfully for me... Any problem please do comment me Steps for installation Iphone SDK 3.0Once you downloaded iPhone SDK 3.0 from apple's site. The next step is to proceed with installation. Before installing iPhone SDK the few things one can know are -> No SDK available for Windows System. -> Right now iPhone SDK available only for MAC OS X. -> iPhone SDK3.0 cannot be installed in the lower version of MAC OS. It needs MAC 10.5.2 or higher(for Leopard). According to the SDK's version the MAC O.S version also gets changed. 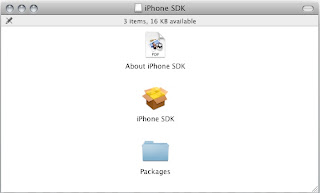 Step1: Just Execute the downloaded iPhone SDK by double clicking it. The window that opened looks like following image. Double click the iPhone SDK icon which is in the middle. (fig No:1.1) Step 2: 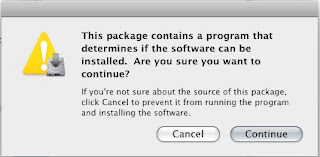 On clicking the iPhone SDK icon a new pop UP will appear. See the (fig No:1.2). Just press continue.. (fig No:1.2) step 3-5: Once again press continue. (fig No:1.3 - fig No:1.5) 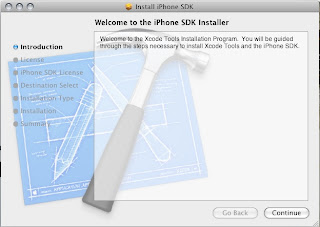 (fig No:1.3) 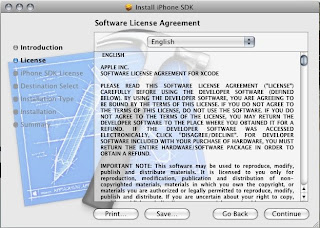 (fig No:1.4) 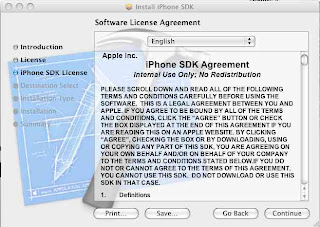 (fig No:1.5) step 6: In sixth step the window (fig No:1.6) appears., the important point that we have to not here is Whether the iPhone SDK checked or not? If it got disabled the SDK wont get install in your OS. so you have to upgrade the OS according to the SDK that you installing and its the final step of installing.. If you installing the iPhone SDK first time instead of appearing 'Upgrade' in Action column you will get 'Install'. 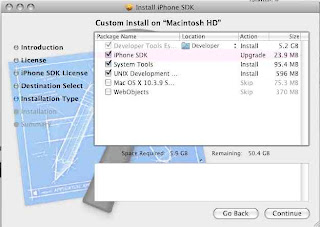 (fig No:1.6) The column 5 and 6 is option. But advisable to install those two also. After installing the SDK just restart the system.
Subscribe to:
Posts (Atom)
Follow Us on Twitter

|


